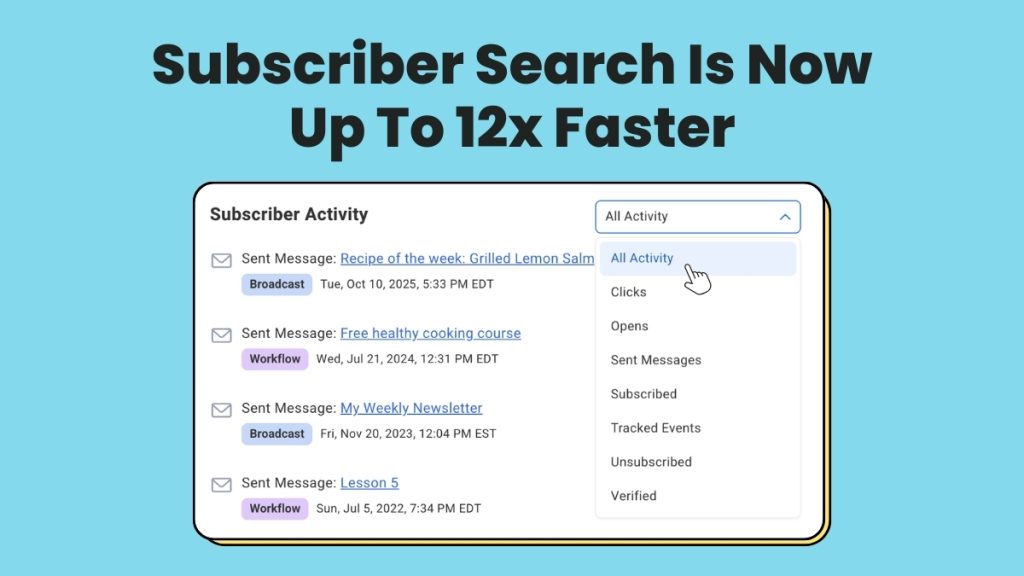
Subscriber search and management just got a major upgrade. Searches are up to 12x faster, profiles show more of what you need to act on, and you can share what you find with your team in one click.
{
“@context”: “https://schema.org”,
“@type”: “VideoObject”,
“name”: “Managing your subscribers just got a massive upgrade”,
“description”: “Subscriber search in AWeber is now up to 12x faster — and that’s just the start. In this video, we walk through every improvement made to subscriber management so you can find anyone, see more of what matters, and share what you find with your team in one click.”,
“thumbnailUrl”: “https://img.youtube.com/vi/qeYPuGXc2r8/maxresdefault.jpg”,
“uploadDate”: “2026-03-03”,
“duration”: “PT2M26S”,
“contentUrl”: “https://www.youtube.com/watch?v=qeYPuGXc2r8”,
“potentialAction”: {
“@type”: “SeekToAction”,
“target”: “https://www.youtube.com/embed/qeYPuGXc2r8={seek_to_second_number}”,
“startOffset-input”: “required name=seek_to_second_number”
}
}
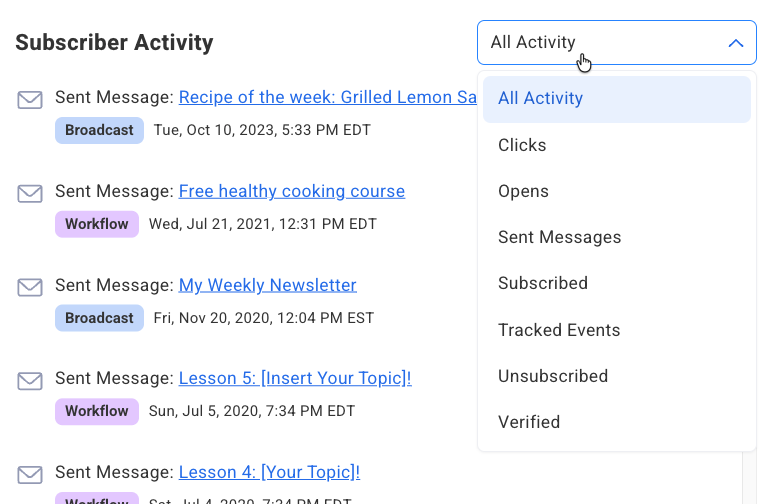
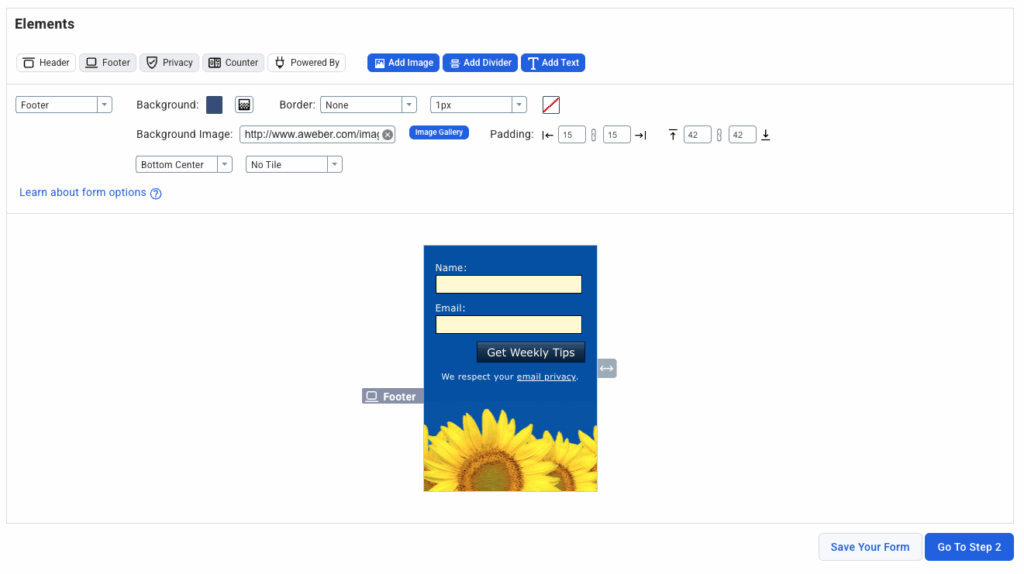
Find Subscribers Faster
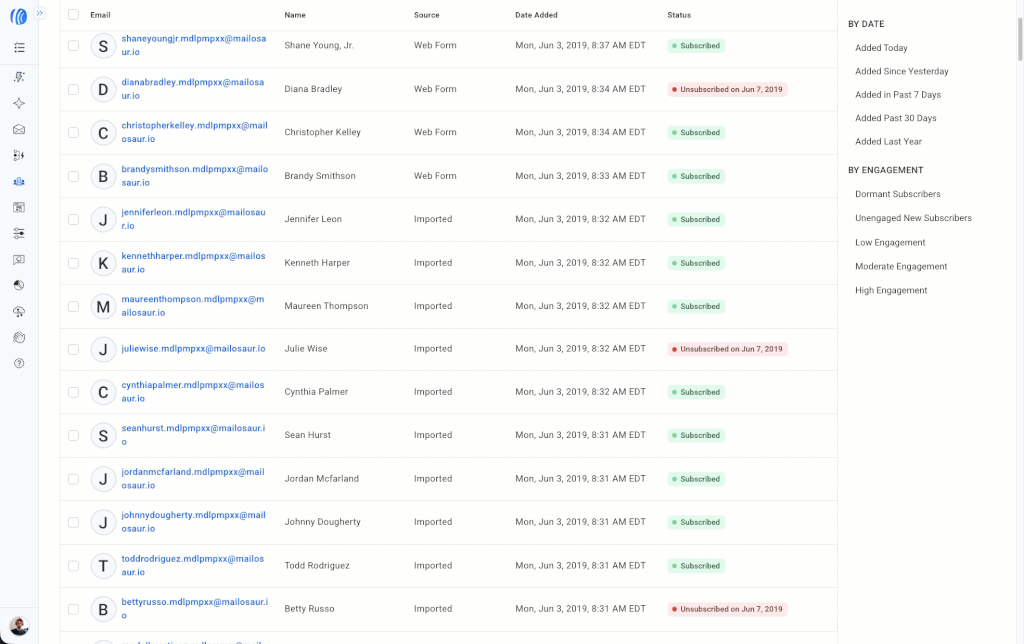
Infinite scroll lets you move through your entire list in one continuous view. Tag, review, or update contacts without losing your place.
Keyboard navigation means you can arrow through profiles, review, move on, and come back without leaving your search results.
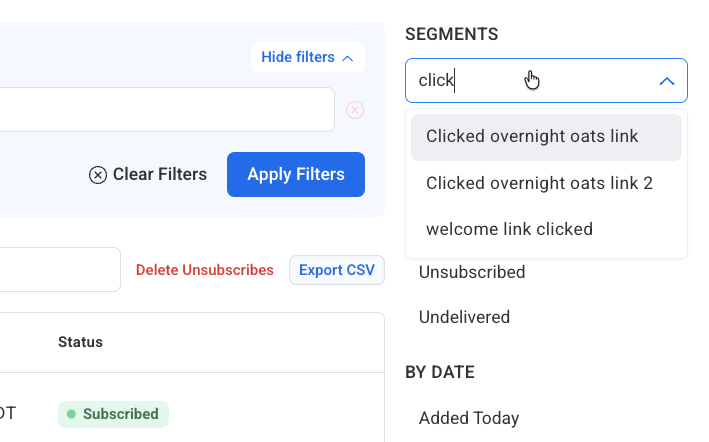
Searchable segments show matching results as you type, even if you have hundreds saved.
See More on Subscribers
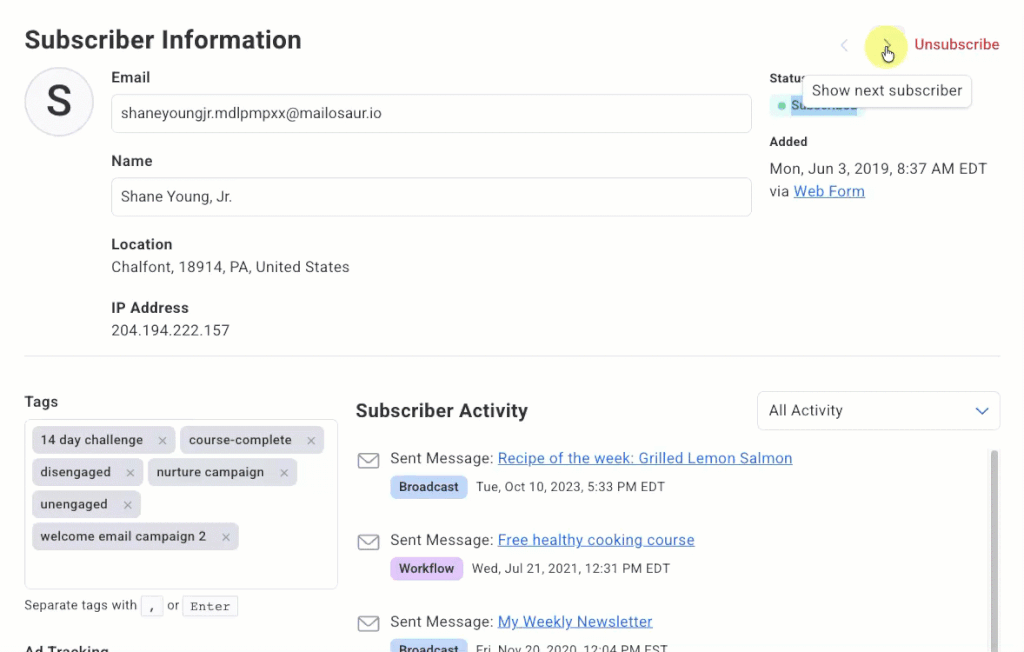
Activity filtering gives you a focused view of any subscriber’s history. Filter by opens, clicks, sent messages, subscriptions, and more to see exactly the signal you’re looking for.
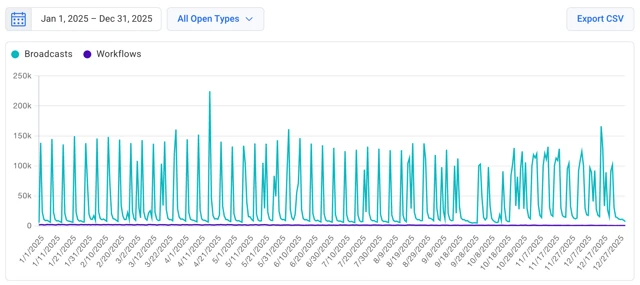
Up to 12 months of data in reports. Open, click, and sale activity now spans a full year in your reports, giving you a longer view of how engagement trends over time.
Improved search builder with type-ahead shows matching criteria as you type. Find any field, including custom fields, in seconds without scrolling through the full options list.
New date search options give you precise control over time-based filters. Valuable for recency-based segments and event-driven campaigns.
Newest subscribers first. Your most recently added subscribers appear at the top of search by default, so reviewing new signups is always the first thing you see when you open the page.
Log in and try a search. You’ll notice the difference immediately.
New to building segments? This guide walks through the basics. And if you want to do more with your subscriber data, these segmentation strategies are a good next step.
Joy Dakinisun, an online business coach, was getting ready to launch her new website quantumleapwithjoy.com. Most of her energy was focused on getting the design right, refining her messaging, and making sure everything reflected her brand.
She knew email marketing would help her capture subscribers from day one. But between finalizing her website, serving clients, and creating content, actually setting it up kept getting pushed to the bottom of her to-do list.
She kept telling herself she’d set it up after launch. But deep down, she knew launching without email meant missing critical opportunities. No immediate value for new visitors. No way to book calls or get support. No foundation for turning interest into income from day one.
😫 The Challenge: Launch Your Website With or Without Email Marketing
Joy’s email marketing was becoming a bottleneck to relaunching her website.
“’When should we get that email marketing set up done? What colors? How?….or just starting simple?'” Joy explains.
She tried setting it up herself but hit the technical learning curve.
“I tried to set up everything by myself. Noticing that there was a lot to learn first to really get a professional look even if content creation is easier for me as a writer. So I quit and focused on other priorities first.”
Joy faced a tough choice: launch without email marketing and miss building her list from day one, or delay her launch to get it right.
💡 The Solution: Professional Email Marketing Ready at Launch
AWeber’s Done For You service solved her exact problem. She could launch on schedule with professional email marketing ready to capture subscribers from day one.
What the service provided:
Email template matching her new website
Automated email series welcoming her new clients
Sign up form and landing page to grow her email list
“Done For You literally saved us hours of work and a starting point that not only was simple, but professionally elegant,” Joy says.
📈 The Results: Launched on Schedule with Email Ready to Grow Her Audience
Joy launched her website with professional email marketing ready to go.
What Joy achieved:
Launched on schedule with email marketing ready from day one
Professional brand-consistent design across website and email
More time for her clients
Peace of mind knowing her email system was waiting to be activated
“I now can focus on other priorities and know that if everything else is set up, the AWeber Done For You set up is waiting in the background to be integrated,” Joy explains.
🚀 Ready to Launch Your Website with Email Marketing Already Set Up?
Email marketing shouldn’t be an afterthought you handle “after launch.” Having it ready from day one means you start building your list immediately—not six months later.
Here’s how to launch with email ready:
Start with AWeber’s Done For You service to get professional email marketing ready to capture subscribers from day one
Get your email setup done in parallel with your website so both launch together
Start building your list immediately instead of losing months of potential subscribers
Have consistent, branded communication ready from first contact
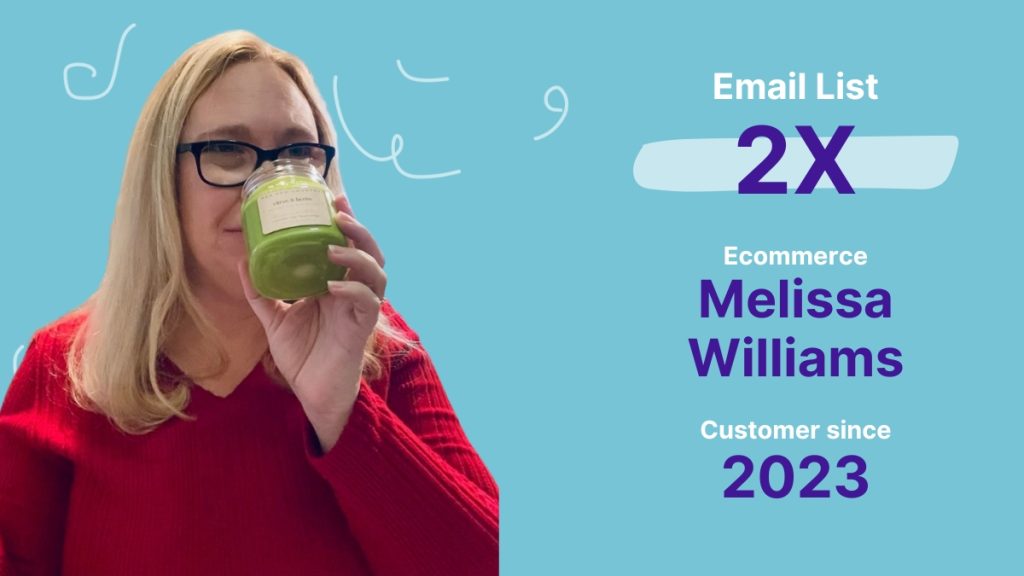
When you’re making and selling candles and wax melts, your time goes into what you do best—pouring, scenting, and creating products your customers love. For Melissa Williams, founder of Pea Pod Country, most of her business hours are spent in production mode, crafting the candles and wax melts that keep her customers coming back.
She knew email marketing would help her business grow. But between production, fulfillment, and running her business alongside full-time commitments, actually setting it up kept getting pushed to tomorrow.
😫 Challenge: Not Enough Time for Email Marketing
For Melissa, the biggest challenge was finding the time to do email marketing.
“As a maker running a side business, I spend most of my business time in production,” Melissa explains.
Setting up her branded emails, building message templates, and creating a landing page? It was always on her to-do list, but she never quite found the time.
Meanwhile, her business needed consistent customer communication to keep growing. But she was too busy making products to set up the system that would help her reach more customers.
✅ Solution: AWeber’s Done-For-You Service
When Melissa discovered AWeber’s Done-For-You (DFY) service, the decision was simple:
Let emailexperts set it up the right way instead of learning it herself
Get up and running quickly without waiting for free time
Get email templates and pages that match her brand
Set up a sign up form to collect new leads
Keep her time where it mattered most—creating products
“When I saw AWeber offered done for you service, it was an easy decision to make the investment. I didn’t have to keep waiting on myself to stop and figure email out.”
How DFY works: She provided her brand colors, logo, and business story—things she already had. AWeber’s team of email experts built her branded landing page, created email templates, and set up her email marketing.
Now, instead of staring at a blank screen each week, Melissa receives AI-drafted emails tailored to her business. She reviews them, provides any feedback, and schedules. Done.
📈 Results: Doubled Her List and 5 Hours Saved Monthly
2x Email list
Save 5 hours A month
Since launching with AWeber’s Done-For-You service, Melissa has seen real results:
List doubled in size through her new landing page
5 hours saved per month – No more drafting emails from scratch
Consistent customer communication – Regular emails without the stress
Business growth – Email marketing finally supporting her goals
“Since I launched email, it has enabled me to consistently reach customers and keep my business growing.”
Her list is growing organically now that she has a landing page where potential customers can sign up for updates.
And the time savings? Significant.
“I wish I had invested in DFY sooner.”
🚀 Ready to Finally Launch Your Email Marketing?
If you’ve been putting off email marketing because you’re too busy running your business, AWeber’s Done-For-You service can help you:
Launch in 7 days – Professional setup without the learning curve
Save hours every week – Get AI-drafted emails you just review and send
Grow your list on autopilot – Landing pages that convert visitors into subscribers
Maintain consistency – Regular emails without the time commitment
Focus on your craft – Spend time on what you do best,
Professional branding – Templates and pages that match your brand
“I wish I had invested in DFY sooner. It was far quicker to give these details than to figure out how to do one more technical thing for my business.”
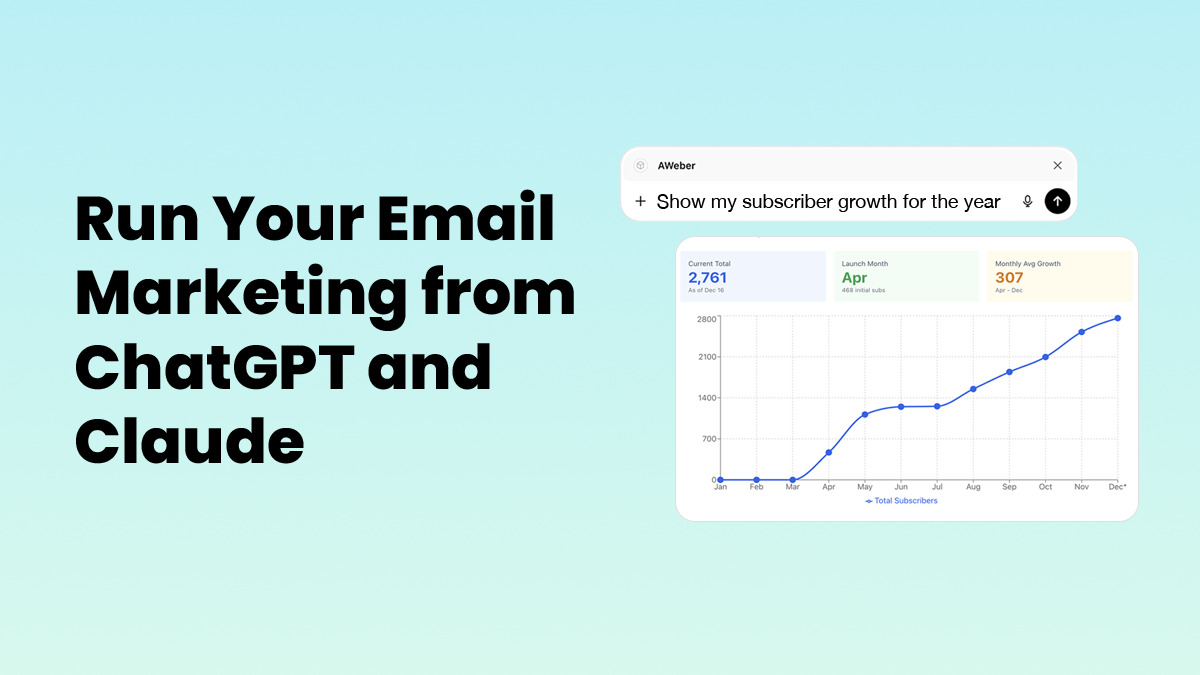
What if you could run your entire email marketing operation from ChatGPT or Claude?
AWeber connects directly to ChatGPT and Claude. Link your account once. Then manage everything conversationally. Write campaigns, analyze performance, manage subscribers, create forms—without switching tools.
Do you know your data is telling you something, but you’re not sure what?
Ask ChatGPT or Claude to analyze your campaigns:
“Which of my last 10 emails got the highest engagement? What did they have in common?”
“My open rates dropped this month. What might be causing it?”
“Compare my urgency-focused subject lines to my curiosity-focused ones. Which performs better?”
AI reviews your actual campaigns. You get insights in seconds, not hours.
Get insights you might miss reviewing dashboards yourself.
✍️ Write emails based on what’s already working
Starting from scratch every time you write an email?
Let AI write new campaigns based on your past performance:
“Look at my best-performing broadcasts and write a new email following those patterns”
“Write a welcome email using the tone from my highest-engagement broadcasts”
“My last product launch underperformed. Write a better version based on my successful product emails”
AI understands what resonates with your audience. It creates content that matches.
👥 Manage your list without opening AWeber
Constantly switching tabs to update subscribers?
Handle list management conversationally:
“Add sarah@example.com to my Newsletter list with the ‘lead’ tag”
“Show me everyone who subscribed in the last 7 days”
“Move subscribers with the ‘trial-expired’ tag to my Re-engagement list”
“How many subscribers have the ‘customer’ tag?”
Manage your entire list by describing what you want. No clicking. No menus.
📝 Create signup forms through conversation
Need a signup form but don’t want to deal with form builders?
Describe what you want. AI generates the code:
“Create a signup form for my fitness newsletter with fields for name and email”
“Build a form that adds subscribers to my Workshop list with the ‘webinar-attendee’ tag”
“Generate a simple newsletter signup form for my homepage”
Get ready-to-use HTML forms. No form builder required.
📈 Make decisions faster
When you’re planning your next campaign, AI provides context:
“I’m writing about our new service. Show me how my last three service announcements performed and recommend an approach”
“Should I send this campaign on Tuesday or Thursday? What does my data say?”
“What’s my average open rate for the past month? What changed?”
Stop hunting for data. Start making informed decisions instantly.
How It Works
The AWeber MCP uses Model Context Protocol, a bridge that lets AI tools talk directly to your AWeber account.
Connect your AWeber account to ChatGPT or Claude once. After that, AI can access your subscriber data, campaign analytics, and list management tools.
You work conversationally. Ask questions. Request actions. Get strategic recommendations. No jumping between apps.
AI sees your complete performance picture. It helps you execute based on your actual results.
Join the Beta
AWeber MCP is currently in beta. We’re inviting a small group of early testers to explore conversational AI for email marketing. Your feedback shapes what we build next.
{
“@context”: “https://schema.org”,
“@type”: “VideoObject”,
“name”: “Introducing the AWeber Subject Line Assistant”,
“description”: “The brand new AWeber Subject Line Assistant helps you write subject lines with ease and send with confidence. It checks your subject line against a set of best practices to help ensure your emails make it to the inbox and get opens.”,
“thumbnailUrl”: “https://img.youtube.com/vi/8ZOzqWYSFyM/maxresdefault.jpg”,
“uploadDate”: “2024-05-20”,
“duration”: “PT3M57S”,
“contentUrl”: “https://www.youtube.com/watch?v=8ZOzqWYSFyM”,
“embedUrl”: “https://www.youtube.com/embed/8ZOzqWYSFyM”
}
Your subject line determines whether subscribers open your email or scroll past it. You can write brilliant content and design a beautiful email. But if your subject line doesn’t grab attention, none of that matters.
Why Subject Lines Matter More Than You Think
Most subscribers decide whether to open an email in under three seconds. They’re scanning dozens of subject lines, looking for something that feels relevant right now.
A strong subject line does two things: it grabs attention and sets accurate expectations. You’re not trying to trick anyone into opening—you’re showing them why this email matters to them.
The challenge? Writing subject lines that work takes practice. You need to balance clarity with curiosity, length with impact, and personality with professionalism.
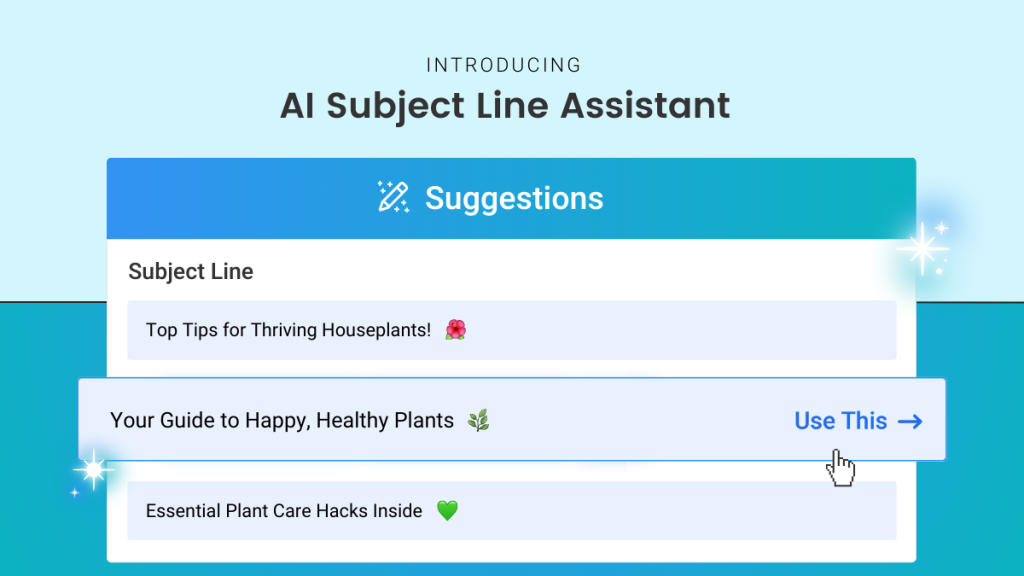
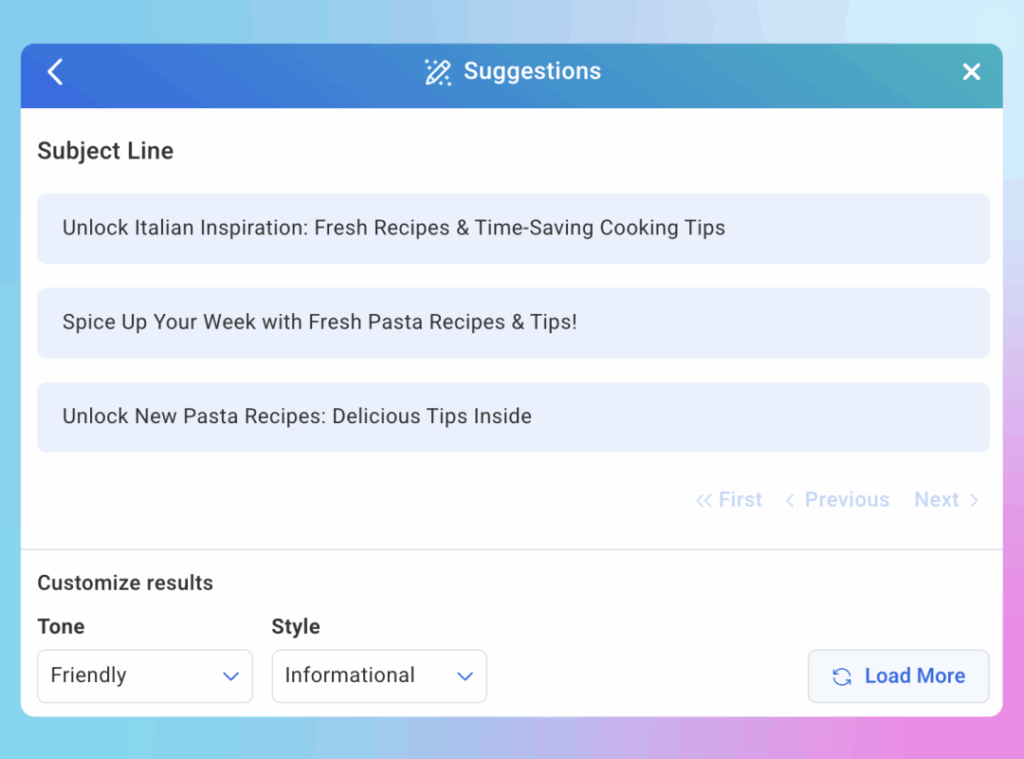
Subject Line Assistant: Your Built-In Writing Partner
AWeber’s Subject Line Assistant generates multiple subject line options based on your actual email content.
Here’s how it works: You write your email first. Then the Assistant analyzes your content and creates several variations – each using a different proven approach like urgency, curiosity, benefits, or questions.
Every suggestion follows email best practices automatically: mobile-friendly length, strategic formatting, effective emoji use.
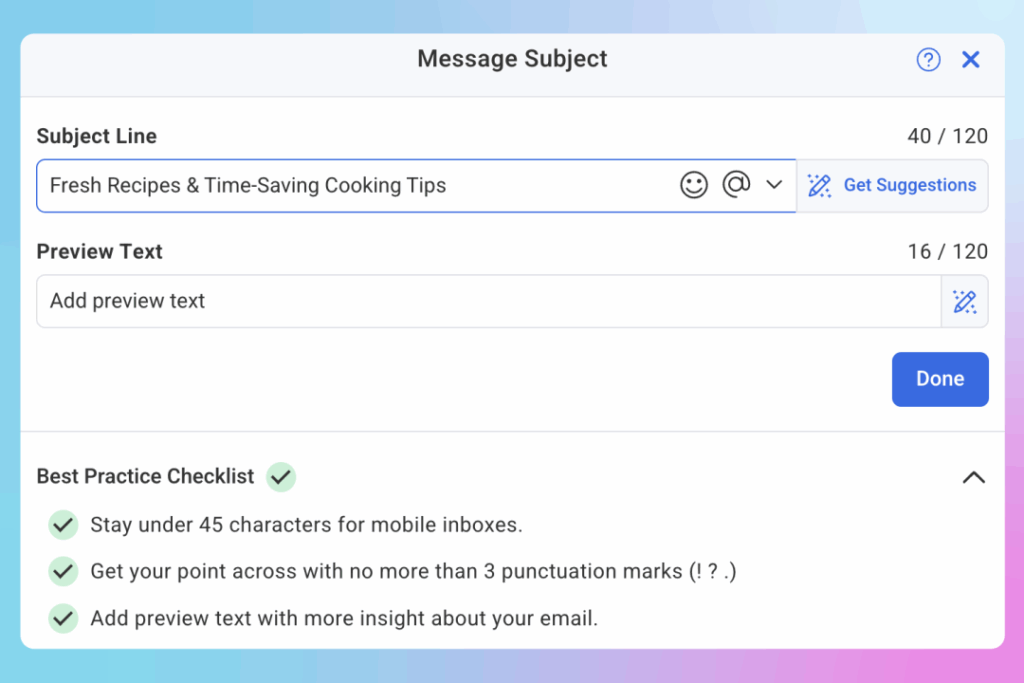
Using the Tool
Start by writing your email content. When you’re ready, select “Insert Your Subject Line” and click “Get Suggestions.”
The Assistant creates multiple options instantly. Review them, pick the one that fits your voice, and send.
Customize for Your Audience
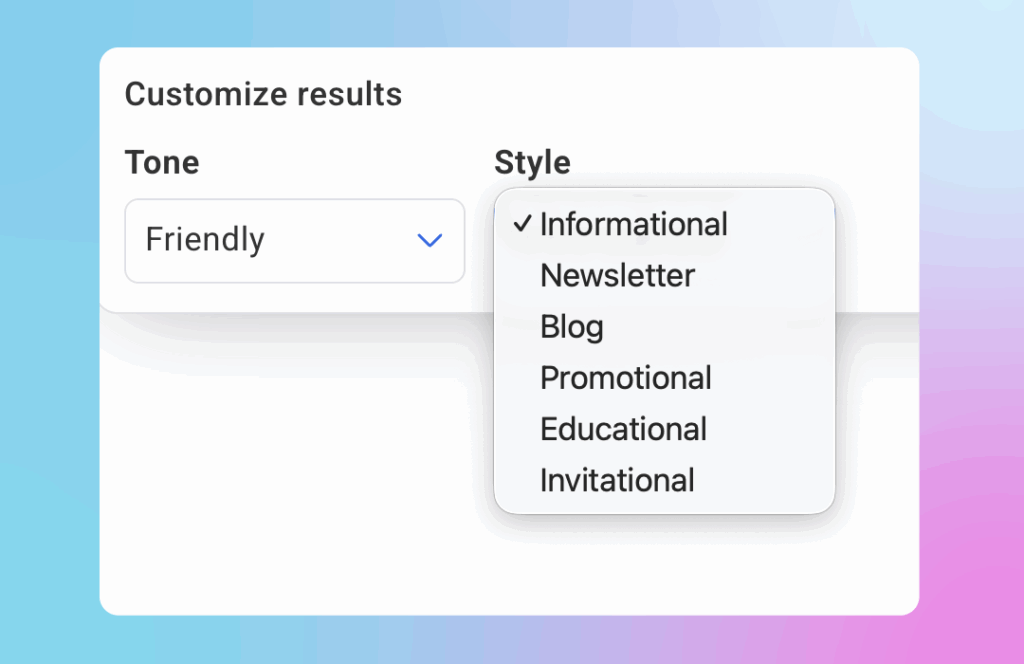
Not every email needs the same tone. A flash sale requires urgency. A weekly newsletter works better with a friendly, conversational approach.
Adjust the tone (friendly, professional, urgent, inspirational) and style (informational, newsletter, promotional, educational) to match what you’re sending.
The tool adapts to your needs—you stay in control of your voice.
Built-In Quality Checks
Each subject line includes a best practices evaluation: character count for mobile, punctuation effectiveness, and how well it pairs with preview text.
Generate Preview Text Too
The Subject Line Assistant also generate preview text. Your preview text appears next to your subject line in inboxes. It’s your second chance to grab attention.
Use the Assistant to create preview text that works with your subject line. Both elements work together to show subscribers your email’s value before they open.
Try It This Week
Next time you’re writing an email, open the Subject Line Assistant. Generate a few options. Pick the one that feels right, or A/B test it against what you would’ve written.
The tool is already in your AWeber account. Look for “Insert Your Subject Line” when you’re editing any campaign.
Your email content might be excellent, but if the formatting looks thrown together, subscribers notice. Mismatched fonts, inconsistent button colors, and random link styling make your business look disorganized even when everything else is professional.
The problem isn’t your design skills. It’s that most email platforms make you format every element individually. Change your button color? Click through every single button. Update your headline font? Go through every heading one by one. By the time you’re done, you’ve spent 15 minutes on formatting instead of strategy.
Here’s the better approach: centralized style controls that let you set formatting once and apply it everywhere.
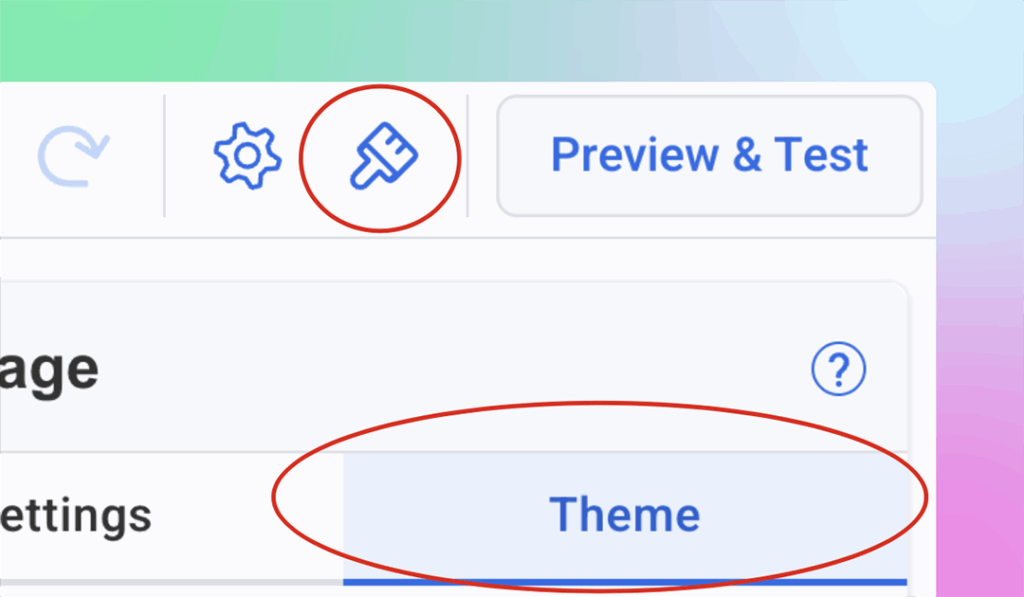
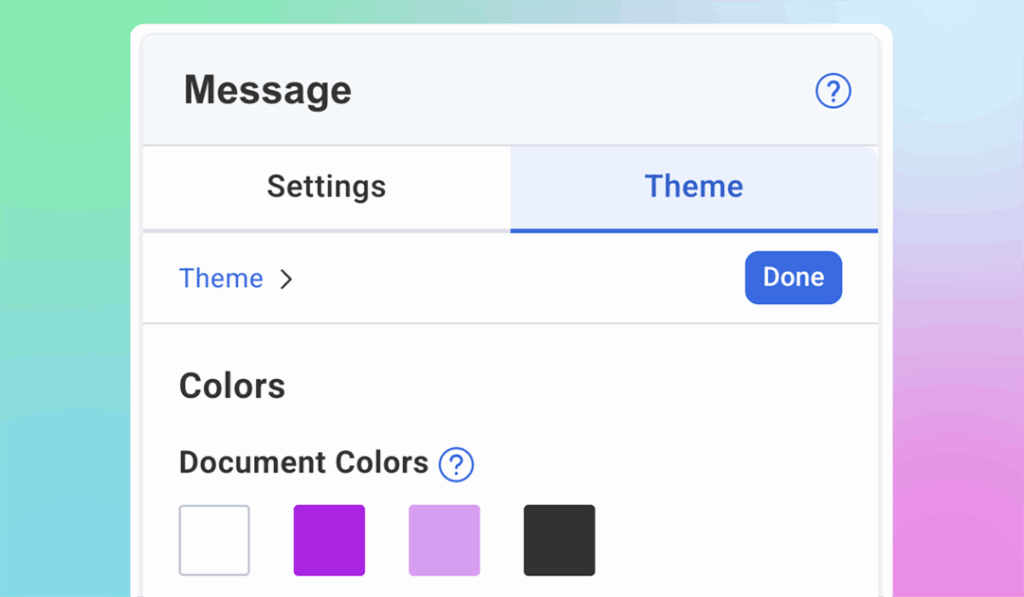
Theme Settings: Format Once, Apply Everywhere
In AWeber there is a universal Theme Settings which allows you to format your entire message from one place. Open your message editor and click the Theme tab (paintbrush icon), and you’ll see controls for fonts, colors, buttons, links, and dividers.
Set your styling preferences once. Every headline, button, link, and text block follows those rules automatically. Change your button color? Every button in your email updates instantly. Update your heading font? Every headline adjusts automatically.
This is how you create consistently polished emails in under 2 minutes instead of 15.
Below are best practices for each element you control in Theme Settings – practical guidelines you can apply to make your emails look professional and drive action.
Headings and Paragraphs: Typography That’s Easy to Read
Your font choices affect readability more than almost anything else. Two rules matter most: use no more than two font families per email, and make sure body text is easy to read on mobile screens.
Headers: Choose a font that matches your business personality. Sans-serif fonts (Arial, Helvetica, Verdana) feel modern and clean. Serif fonts (Georgia, Times New Roman) feel traditional and authoritative. Pick one and stick with it for all your headlines – H1, H2, and H3 should all use the same font family.
Body text: Prioritize readability over style. Use 14-16px for body text (anything smaller is hard to read on mobile). Stick with standard web-safe fonts that render consistently across email clients. Avoid decorative fonts for paragraphs—they slow reading speed and look unprofessional in large blocks of text.
Colors: Your text needs enough contrast to be readable. Black or dark gray on white works best for body text—it’s easy on the eyes and works across all devices.
For headlines, you can use accent colors to add visual interest, but make sure the text is still easy to read. If you squint at your screen and struggle to read the headline, the color is too light. Darker shades of your accent colors work better than pastels or light tones.
In AWeber’s Theme Settings: Set your heading fonts (H1, H2, H3) and paragraph fonts once. Choose text colors for both headings and body copy. Every text block in your email follows these rules automatically – no clicking through individual sections.
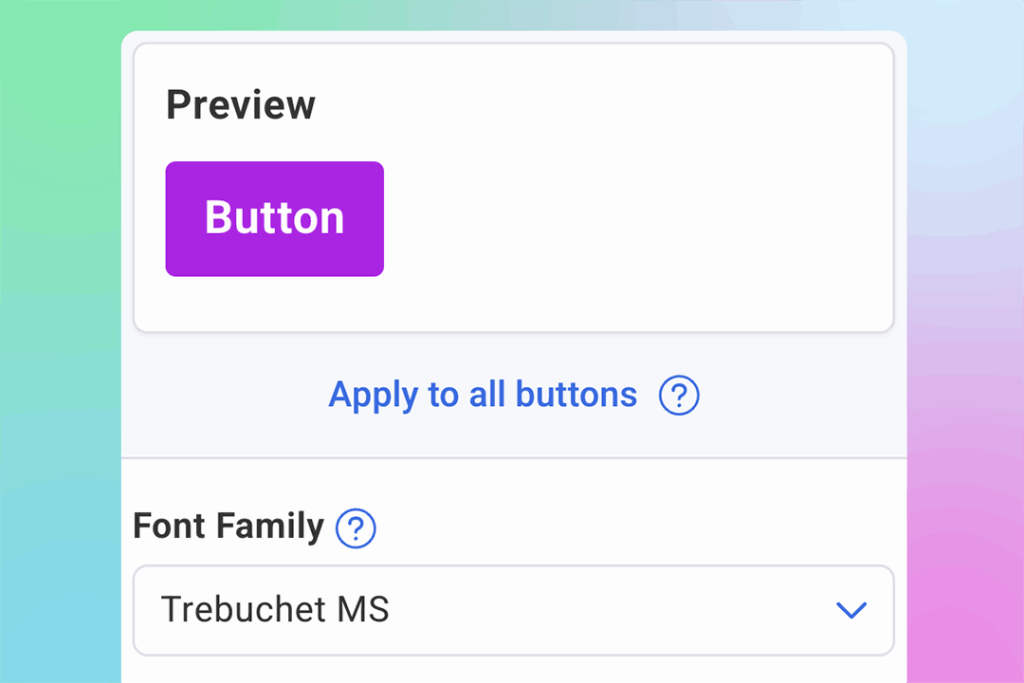
Call-to-Action Buttons: Make Them Impossible to Miss
Your CTA button drives the action you want subscribers to take. Make it stand out without looking garish.
Size: Buttons should be large enough to tap easily on mobile – at least 44px tall. Too small and subscribers struggle to click. Too large and they look cartoonish.
Color: Use a button color that contrasts with your email background. If your email uses a white background, bright colors (blue, green, orange, red) work well. Avoid subtle colors that blend in, your button should be the most visually prominent element in that section.
Text: Button text should be action-oriented and specific. “Download the Guide” performs better than “Click Here.” Keep it short – 2-4 words works best.
Consistency: Every button in your email should look identical unless you have a specific reason for variation. Mixed button styles look unprofessional and confuse subscribers about which actions matter most.
In AWeber’s Theme Settings: Update button font, size, text color, and button background color from one place. Every CTA button in your message matches instantly, making your emails look intentional and increasing the chances subscribers take action.
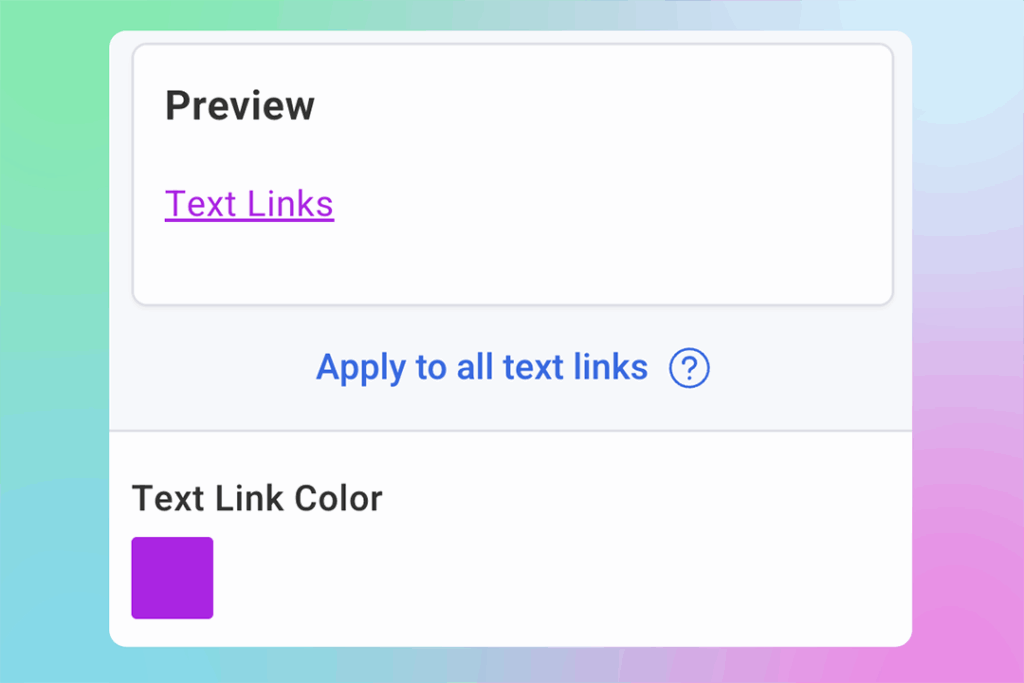
Links: Make Clickable Text Obvious
Links need to be immediately recognizable as clickable without disrupting reading flow.
Color: Choose a link color that stands out from body text. Often, linked text defaults to system-blue, but your links can match your color palette instead for a more polished look. Just make sure they’re obviously different from regular text.
Underlines: Keep links underlined. Some designers prefer removing underlines for aesthetics, but underlines signal “this is clickable” universally. Don’t make subscribers guess what’s a link.
Consistency: All links in your email should use the same color. Switching between blue links and red links mid-email looks sloppy.
In AWeber’s Theme Settings: Set your link color once. Every hyperlink throughout your email updates automatically. Consistent link styling improves readability and helps subscribers immediately recognize what’s clickable.
Dividers: Organize Content Without Distraction
Dividers separate sections and create visual breaks that make emails easier to scan. They’re subtle but important.
Style: Simple lines work best. Avoid overly decorative dividers, they distract from content. Solid lines are standard. Dotted or dashed lines can work for softer visual breaks.
Color: Dividers should be noticeable but not prominent. Light gray works for most emails. You can use accent colors if you want dividers to play a stronger role in your visual hierarchy, but keep them lighter than your text.
Width: Full-width dividers (edge to edge) create strong section breaks. Partial-width dividers (50-80% of container) create softer breaks. Choose based on how much separation you need between sections.
In AWeber’s Theme Settings: Change divider style, color, and width from one place. Every divider in your message updates consistently, making your email easier to scan and more organized.
Email Colors: Create Visual Hierarchy
Your color palette establishes mood and helps guide the reader’s eye through your content.
Background: Most emails use white or very light gray backgrounds because they’re easiest to read. Darker backgrounds can work but require lighter text colors and more careful contrast management.
Accent colors: Choose 1-2 accent colors for buttons, links, and highlights. More than that looks chaotic. Your accent colors should contrast with your background—if you’re using white, bright or saturated colors work well.
Consistency: Use the same colors throughout your email. Your buttons should all be one color. Your links should all be one color. Switching colors randomly looks unprofessional.
In AWeber’s Theme Settings: Update your document color palette—the core colors used throughout your email for text, backgrounds, buttons, and accents. Consistent colors make your emails look polished and professional instead of thrown together.
The Formatting Shortcut: Theme Settings
Here’s what separates efficient email creation from tedious manual work: centralized style controls.
Instead of clicking through every text block to update fonts, every button to match colors, and every link to stay consistent, you set your styling preferences once. Then every email element follows those rules automatically.
In AWeber, this is called Theme Settings. Open your message editor, click the Theme tab (paintbrush icon), and you’ll see controls for:
Colors: The palette used throughout your email
Fonts: Heading and paragraph fonts plus text colors
Buttons: Font, size, text color, and background color
Links: Link color across your entire message
Dividers: Style, color, and width
Change any setting once and watch it update everywhere in your email. Need to test a different button color? One click. Want to try a different heading font? Updates every headline instantly.
This is how you create consistently beautiful emails without spending 15 minutes per message clicking through individual elements.
Put It Into Practice
Open your next email and apply these principles:
Choose two fonts: One for headlines, one for body text. Set them in Theme Settings.
Pick your colors: Select a button color that contrasts with your background. Choose a link color that stands out from body text. Set your accent colors once.
Format your buttons: Make them large enough for mobile taps (20px minimum). Use action-oriented text. Keep them consistent throughout your message.
Style your links: Make sure they’re underlined and use a distinct color. Set it once, applies everywhere.
Use dividers strategically: Add visual breaks between major sections. Keep them simple and consistent.
Your emails now look polished, professional, and intentional because everything matches automatically. Subscribers notice the difference, even if they can’t articulate why your emails look more credible than others in their inbox.
That’s the power of consistency. And now you know how to achieve it without the manual work.
Ready to create consistently beautiful emails?Signup for AWeber (or log into your account) and click the Theme tab in your message editor. Set your fonts and colors once – watch everything update automatically.
You’ve already created the content. Your blog posts contain insights, strategies, and information your audience values. The question isn’t whether to share that content with your email list—it’s how to do it without rewriting everything from scratch.
Your blog content represents hours of research, writing, and editing. Why let it reach only the portion of your audience who happens to find it through search or social media?
Email subscribers are YOUR audience. You control when they see your message, unlike social platforms where algorithms decide what gets shown. When you repurpose blog content for email, you’re giving your best work a second life where it can drive more traffic, engagement, and conversions.
The Manual Approach: What Most People Do Wrong
Before we talk about the fastest way to repurpose blog content, let’s look at why most people struggle with this. The typical approach goes like this:
Copy your entire blog post into an email
Send it hoping people will read 2,000+ words in their inbox
Wonder why open rates are terrible and nobody’s clicking
The problem isn’t the content itself—it’s that blog posts and emails serve different purposes. Blog posts are designed for deep reading on a screen where someone has already committed to learning about your topic. Emails compete with dozens of other messages in an inbox where attention spans are measured in seconds.
Effective blog-to-email repurposing requires two key adjustments:
Extract the hook: Your email needs a compelling reason to click through to the full post. What’s the single most valuable takeaway or surprising insight? That becomes your email focus—not a comprehensive summary of everything in the post.
Adapt for scanning: Email readers scan more than they read. Your repurposed content needs shorter paragraphs, clearer benefits, and a more conversational tone than your original blog post. Strip out the SEO-optimized sections that don’t add value for someone reading in their inbox.
This manual process works, but it takes time. For each blog post you want to repurpose, you’re looking at 30 minutes minimum of rewriting, reformatting, and editing. If you publish multiple posts per week, that time adds up quickly.
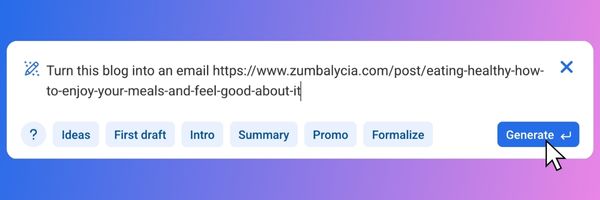
Turn Blog Posts Into Emails in Under 2 Minutes
This manual repurposing process works, but it’s time-consuming. AWeber’s AI Writing Assistant eliminates that friction by converting any blog URL into email-ready copy automatically – no rewriting, no reformatting, just paste and customize.
The AI reads your entire blog post, identifies the core message, and generates a concise email summary that maintains your voice. What normally takes over 30 minutes happens in under 2 minutes.
Here’s how it works:
Step 1: Paste Your Blog URL
Open any message in AWeber and type “/” (forward slash) to open the AI Writing Assistant.
Copy the URL of the blog post you want to repurpose. Paste it into the AI prompt field. You can add context like “Turn this blog post into an email summary” or simply paste the URL—the AI understands what to do.
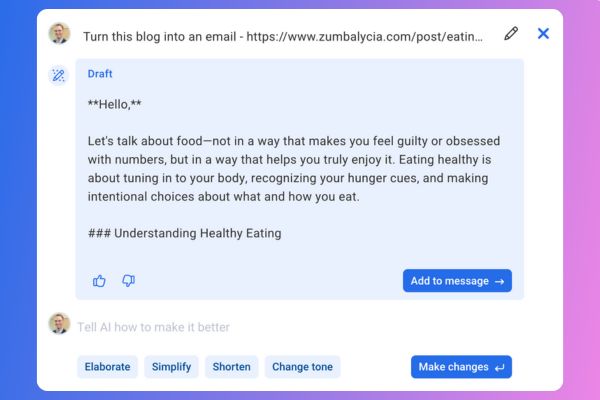
Step 2: Review the Generated Summary
The AI analyzes your blog and creates an email-ready summary in approximately 15 seconds. The generated content captures your main points in 150-300 words, formatted for easy scanning in an inbox.
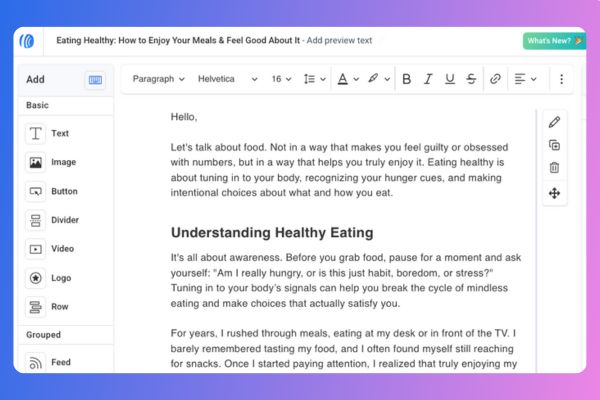
Step 3: Edit and Send
Adjust the tone if needed (more casual, more professional, more urgent), personalize the opening or closing, and customize your call-to-action. Add your subject line using the AI Subject Line Assistant, then send or schedule your message.
What the AI Does Behind the Scenes
When you paste a blog URL, AI Writing Assistant:
Reads the entire blog post – It analyzes your content structure, main points, and key takeaways
Identifies the core message – It determines what matters most to your readers
Condenses without losing meaning – It creates a summary that captures your blog’s value in 150-300 words
Maintains your voice – It matches the tone and style of your original writing
Formats for email – It structures the content for easy scanning with clear paragraphs and natural flow
The AI doesn’t just extract sentences randomly – it understands context and creates cohesive email copy that reads naturally.
Using Blog Content in Different Ways
Single post summary: Paste one blog URL to create a dedicated email about that topic.
Newsletter roundups: Paste multiple blog URLs separately, generate summaries for each, then combine them into one newsletter highlighting your recent content.
Automated sequences: Use summaries in welcome workflows to introduce new subscribers to your best content.
Beyond Blog Posts: Other Content You Can Repurpose
AI Writing Assistant works with any URL, not just blog posts. Use it to repurpose:
Social media posts – Turn popular Twitter threads or LinkedIn posts into email content
Product pages – Create email announcements from new product launches
Landing pages – Summarize webinar or event pages for email promotion
News articles – Share relevant industry news with your commentary
Video descriptions – Convert YouTube video descriptions into email summaries
The same process works for any web content—paste the URL, generate the summary, customize, and send.
Related Features That Speed Up Email Creation
AI Subject Line Assistant generates multiple subject line options based on your message content. After creating your email from a blog post, click “Get Suggestions” in the subject line field to see 5+ AI-generated options optimized for mobile length and engagement.
Newsletter Assistant learns your writing style from your website and past emails, then automatically drafts weekly newsletters without requiring prompts. It proactively creates newsletter content that you can review, edit, and send.
Workflow Automation delivers your blog content automatically when subscribers join specific segments. Create a workflow that sends your top blog posts to new subscribers over their first 30 days.
Try It This Week
Pick one blog post you’ve published recently. Open a new message in AWeber and paste your blog URL in the AI Writing Assistant. See how quickly the AI converts your content into email-ready copy.
Compare the 2 minutes you spend generating and customizing the summary to the 30+ minutes you’d typically spend rewriting your blog content from scratch.
Every email you send generates valuable data about subscriber behavior. Understanding this performance data helps you make smarter decisions about future campaigns – which subject lines catch attention, what content drives clicks, and when your audience engages most.
AWeber’s Quickstats gives you everything you need to measure and improve your email performance metrics. Here’s how to track each key metric and use what you learn.
How to Access Your Campaign Stats
Navigate to any sent campaign in your AWeber account and click “View Stats.” Quickstats opens with your complete performance data – email preview on the left, key metrics at the top, and detailed engagement data below.
What Does Each Key Metric Tell You
Open Rate
What it measures: The percentage of subscribers who opened your email.
What it tells you:
Whether your subject line caught their attention – A compelling subject line creates curiosity or promises value that makes people want to open
Were they expecting an email from you – Consistent sending schedules and recognizable sender names build trust and improve opens
Was it received at the right time – Sending when subscribers check email increases the likelihood they’ll see and open your message
How to Track Open Rate in AWeber
Navigate to any sent campaign and click “View Stats.” Your open rate appears at the top of Quickstats. Click the “Unique Opens” tab to see detailed data: email address, name, and total opens.
How to Improve Your Open Rate
Open Quickstats for your last 10 campaigns and compare open rates. Look for patterns:
Do questions perform better than statements?
Do specific numbers work well (“3 ways to…” vs. “Ways to…”)?
Does personalization increase opens?
Are shorter subject lines outperforming longer ones?
Do certain words or phrases consistently drive higher opens?
Optimize based on what your open rate reveals:
Low open rates (below your average):
Test more specific, benefit-focused subject lines
Verify your sender name is recognizable
Check if you’re sending when your audience isn’t checking email
Reduce frequency if subscribers are tuning out
Declining open rates over time:
Reduce send frequency to combat email fatigue
Introduce variety in subject line formats
Run a re-engagement campaign to clean your list
Strong open rates but low clicks:
Your subject lines work—keep that approach
Focus improvement efforts on content quality instead
Click-Through Rate (CTR)
What it measures: The percentage of subscribers who clicked a link in your email.
What it tells you:
Whether your content motivated action – Strong CTR means your message created enough interest or urgency to click
If your offers or topics resonated – High clicks on specific links show what your audience cares about
How effective your call-to-action was – Clear, compelling CTAs drive more clicks than vague ones
How to Track CTR in AWeber
Your click rate appears in the top metrics section of Quickstats. Click the “Unique Clicks” tab to see each link URL and the total unique clicks per link. You can also create a segment for people who clicked specific links, allowing you to send them more targeted content in the future.
How to Improve Your Click-Through Rate
Optimize based on what your CTR reveals:
Low CTR despite good opens:
Ensure your email delivers on the subject line promise
Use specific action language in CTAs (“Download the guide” vs. “Click here”)
Break up text with headers, bullets, and white space
Make buttons stand out and ensure mobile formatting works
One link dramatically outperforms others:
Create more content around that high-performing topic
Lead with your best-performing content type in future emails
Product links outperform educational content:
Your audience wants offers more than information
Adjust your content mix to include more promotions
Total Sales
What it measures: Revenue generated directly from your email campaign when integrated with e-commerce tracking.
What it tells you:
Which campaigns drive actual revenue – Not just clicks, but purchases
ROI of your email marketing – How much money each campaign generates
Which products or offers convert best – What your audience actually buys after clicking
How to Track Total Sales in AWeber
Total sales appears in the top metrics section of Quickstats when you have e-commerce tracking enabled. This metric shows the dollar amount generated from purchases made after clicking links in your campaign.
How to Improve Your Sales Performance
Optimize based on what your sales data reveals:
High clicks but low sales:
Your email drives traffic but your landing page or offer isn’t converting
Check if pricing, shipping costs, or checkout friction are causing drop-off
Ensure the offer in your email matches what’s on the landing page
Certain products consistently generate more sales:
Feature your best-selling products more prominently in emails
Create dedicated campaigns around high-converting items
Use social proof and urgency around products that sell well
Sales vary significantly between campaigns:
Identify what’s different about high-revenue campaigns—subject line, send time, offer type, or audience segment
Replicate the approach of your best-performing sales campaigns
Unsubscribes
What it measures: The number and percentage of subscribers who opted out after receiving your campaign.
What it tells you:
Whether your content matched subscriber expectations – High unsubscribes mean you’re sending content people didn’t sign up for
If you’re sending too frequently – Sudden unsubscribe spikes often follow frequency increases
How relevant your offers are – Irrelevant or overly promotional content drives opt-outs
How to Track Unsubscribes in AWeber
Your unsubscribe count and rate appear in the top metrics section of Quickstats. The percentage shows how many people opted out relative to total emails delivered.
A normal unsubscribe rate is typically under 0.5% per campaign. Anything above 1% signals a problem.
How to Improve Your Unsubscribe Rate
Optimize based on what your unsubscribe rate reveals:
Sudden spike in unsubscribes (2-3x your normal rate):
Review what was different about this campaign—subject line, content, offer, or tone
Check if you increased send frequency recently
Ensure your content aligns with what subscribers originally signed up for
Consistently high unsubscribe rate (above 0.5%):
Survey remaining subscribers about content preferences
Reduce send frequency
Segment your list so people only receive relevant content
Review your signup process—are you setting accurate expectations about what you’ll send?
Unsubscribes concentrated around specific content types:
Some subscribers want educational content, others want promotions—segment based on preferences
Offer a preference center where subscribers can choose what they receive instead of unsubscribing completely
Low unsubscribes but also low engagement:
While low unsubscribes seem positive, subscribers may be ignoring you instead of opting out
This can hurt deliverability more than unsubscribes
Run a re-engagement campaign to clean inactive subscribers
How Quickstats Makes Email Performance Easy to Track
AWeber’s Quickstats puts all your campaign data in one place – no switching between multiple reports or clicking through pages of information.
Everything you need at a glance:
Email preview alongside your data – See exactly what subscribers received while reviewing performance
Key metrics at the top – Total sends, opens, clicks, bounces, and unsubscribes display immediately
Infinite scroll – Review all subscriber activity without pagination—just keep scrolling through opens and clicks
Message Actions menu – Export data or copy campaigns to drafts in two clicks from the top of the page
Full-screen charts – Expand any engagement chart to see detailed trends over time
Navigate to any sent campaign and click “View Stats.” Quickstats opens with your complete performance report ready to analyze.
Start Improving Today
Open Quickstats for your three most recent campaigns. Compare their performance metrics side by side. What patterns emerge?
Identify one clear difference between your best and worst performer – subject line format, send time, or content approach. Apply the winning element to your next campaign.
Measure results in Quickstats. Iterate based on what you learn.
Improving email marketing performance is a continuous process of measuring, testing, and refining. Start with one metric, track the results, and build from there.
Your Facebook lead just filled out your form. How long until they get your first email?
If the answer is “hours” or “when I download the CSV tomorrow,” you’re losing conversions. Speed matters—leads who receive immediate follow-up convert at dramatically higher rates than those who wait.
The manual process—downloading CSVs from Facebook Ads Manager, importing to your email platform, triggering your sequence—creates delays that kill conversions. Every hour between signup and first email drops your conversion likelihood.
AWeber’s direct Facebook Lead Ads integration eliminates that delay. Connect once, create automation rules that route leads from specific campaigns to specific email sequences, and your Facebook lead ads email notifications send automatically within 60 seconds of form submission. No manual downloads. No Zapier subscription. No delay.
Why Instant Follow-Up Matters
When someone fills out your Facebook form, they’re thinking about your offer right now. They expect confirmation or next steps.
Manual CSV downloads create three problems:
1. Conversion drops with delay.
Every hour between signup and first email reduces conversion likelihood. The longer the delay between someone expressing interest and receiving your first message, the lower your conversion rate.
2. Manual work introduces errors.
Downloading wrong CSVs, importing to wrong lists, forgetting tags, mapping fields incorrectly—all happen when managing imports manually.
3. Third-party costs add up.
Many businesses pay $20-$100+ monthly for Zapier to bridge Facebook and email platforms.
Direct integration eliminates all three.
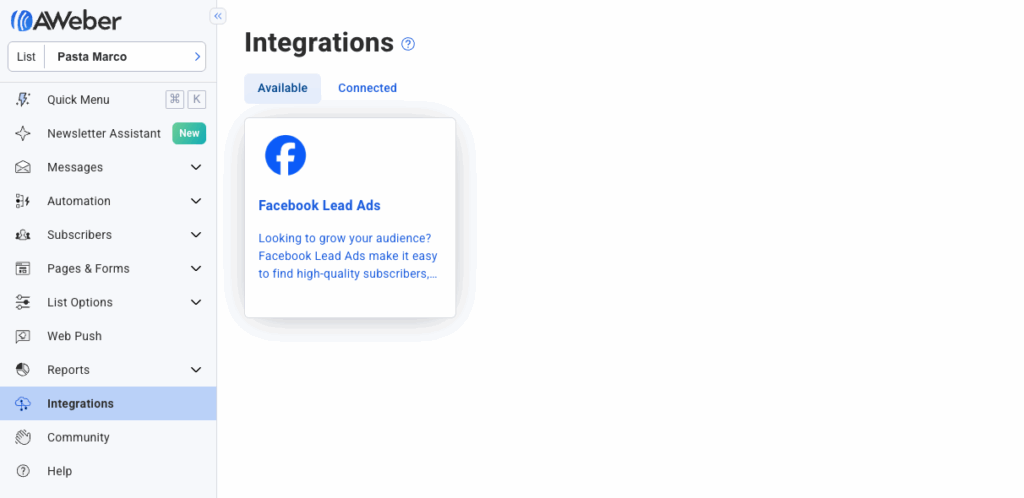
How AWeber’s Facebook Lead Ads Integration Works
Here’s the complete technical flow:
Someone submits your Facebook Lead Ad form
Facebook sends that submission to AWeber via direct API connection (30-60 seconds)
AWeber’s automation rule adds the subscriber to your designated list with specified tags
Your Workflow detects the new tag and immediately triggers your Facebook lead ads email notification
The lead receives your welcome email while still thinking about what they signed up for
The entire process runs hands-off after initial setup.
Log into Facebook and authorize AWeber to access your Lead Ads. This lets AWeber read form submissions—it can’t post on your behalf or access personal data.
Once authorized, you’ll see “Connected” status. This connection works for all your campaigns—you only connect once.
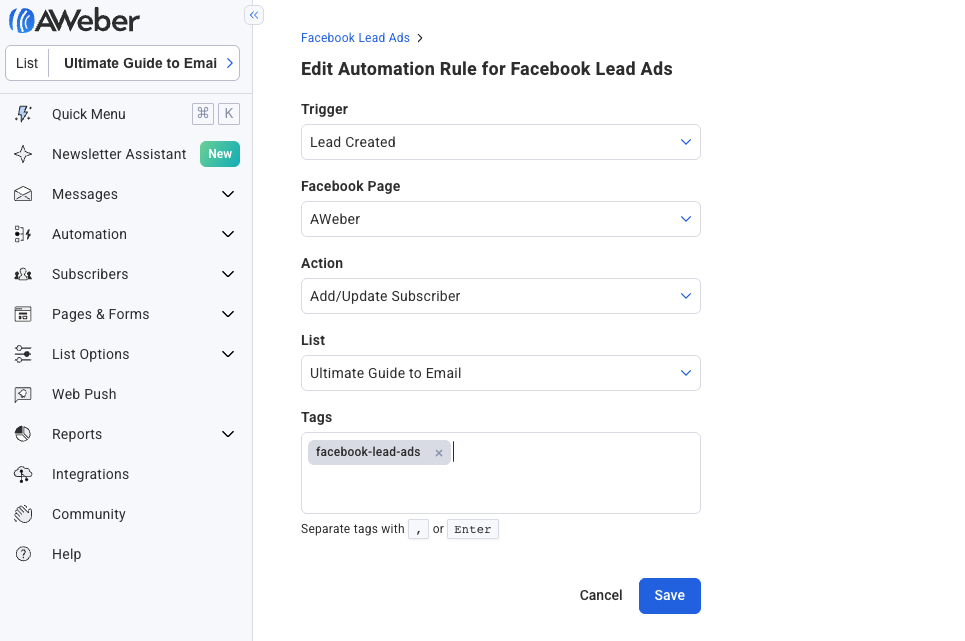
Step 2: Create Automation Rules
Click + Create Rule to route leads from specific Facebook campaigns to specific AWeber lists.
Configure four elements:
1. Trigger: Select which Facebook Lead Ad form triggers this rule. Running multiple campaigns? Create one rule per campaign so each routes correctly.
2. Action: Choose “Add Subscriber”.
3. List: Select which AWeber list receives these leads.
4. Tags: Add tags identifying the lead source (e.g., “FB-FreeGuide” or “FB-ProductDemo-Nov2025”). Tags let Workflows trigger specific email sequences based on campaign.
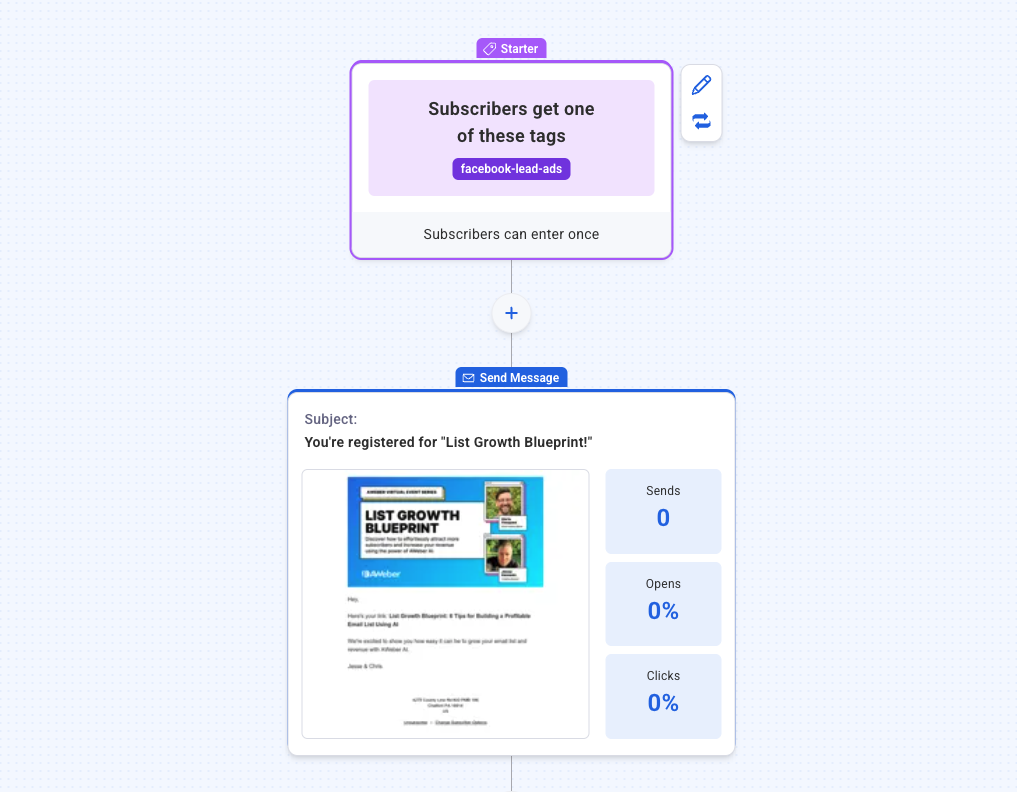
Step 3: Connect to a Workflow
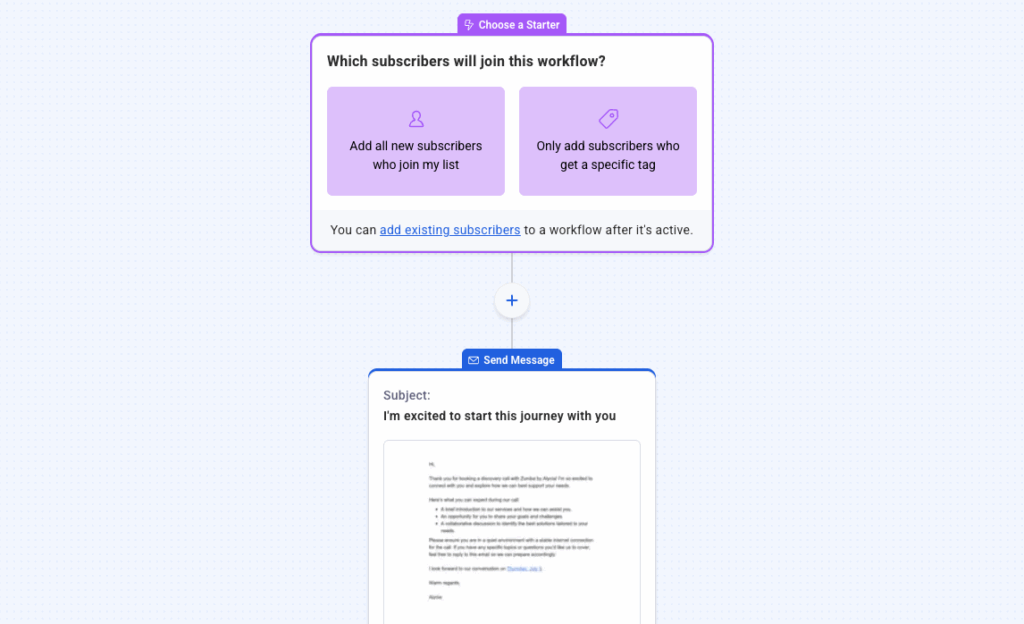
Your automation rule adds leads with tags. Now create a Workflow to send emails.
1. Navigate to Automations → Workflows → Create Workflow →
2. Set trigger to “Only add subscribers who get a specific tag” → Add your Facebook tag (e.g., “FB-FreeGuide”).
Add your welcome email as the first step:
Add a Step → Send a Message
Wait time: 0 minutes (send immediately)
Email content: Welcome email, lead magnet delivery, or confirmation
Now every lead from that Facebook campaign receives your email within 60 seconds of form submission.
Step 4: Test It
Submit a test lead through your Facebook form.
Check your email inbox within 60 seconds—you should receive your welcome email.
Verify the lead appears in your AWeber list with correct tags.
If everything works, your integration is live.
What Your First Email Should Include
Speed matters, but so does content. Your Facebook lead ads email notification should:
Confirm their action immediately. Acknowledge what they did: “Thanks for requesting the guide,” “Your demo is confirmed,” “Here’s your discount code.”
Deliver what they expected. If they signed up for a lead magnet, include the download link immediately. Don’t make them wait for a second email.
Set next steps. Tell them what happens next: “You’ll receive daily tips starting tomorrow,” “I’ll email you the day before our demo.”
Keep it focused. Your first email isn’t the place for your company story. Give them what they came for and set expectations.
Common Mistakes to Avoid
Adding delays to your first email. Leads expect immediate confirmation. Waiting 30 minutes doesn’t make you seem more human—it makes you seem slow.
Forgetting tags. Without tags, you can’t trigger campaign-specific sequences or measure which campaigns drive the best engagement.
Not testing before launching. Submit a test lead and verify everything works before spending money on ads. Finding errors after $500 in ad spend is expensive—finding them in a 30-second test is free.
Start Growing Your List With Instant Follow-Up
Ready to stop losing leads to slow follow-up?
Connect Facebook Lead Ads to AWeber and start converting more leads with instant email notifications.
Don’t have an AWeber account yet?Sign up today and get instant access to Facebook Lead Ads integration, Workflow automation, and all the tools you need to turn leads into customers.
Already using AWeber? Set up your first Facebook Lead Ads integration now—it takes 5 minutes.
Your Wix website attracts visitors—but without email marketing, you’re watching potential customers disappear. Here’s how to capture those leads and turn casual browsers into subscribers you can reach directly.
Why Email Marketing Matters for Wix Sites
Wix powers over 230 million websites worldwide, making it one of the most popular website builders for small businesses, creators, and online stores. But here’s what many Wix users miss: your beautiful website means nothing if visitors leave and never return.
Email gives you a second chance with everyone who visits your site. When someone subscribes, you gain direct access to their inbox—no social media algorithms deciding who sees your posts, no hoping they remember to check back later.
You own your email list. If Wix changed its policies or social media platforms disappeared tomorrow, your subscriber relationships remain intact. That’s power.
How to Integrate Email Marketing with Wix
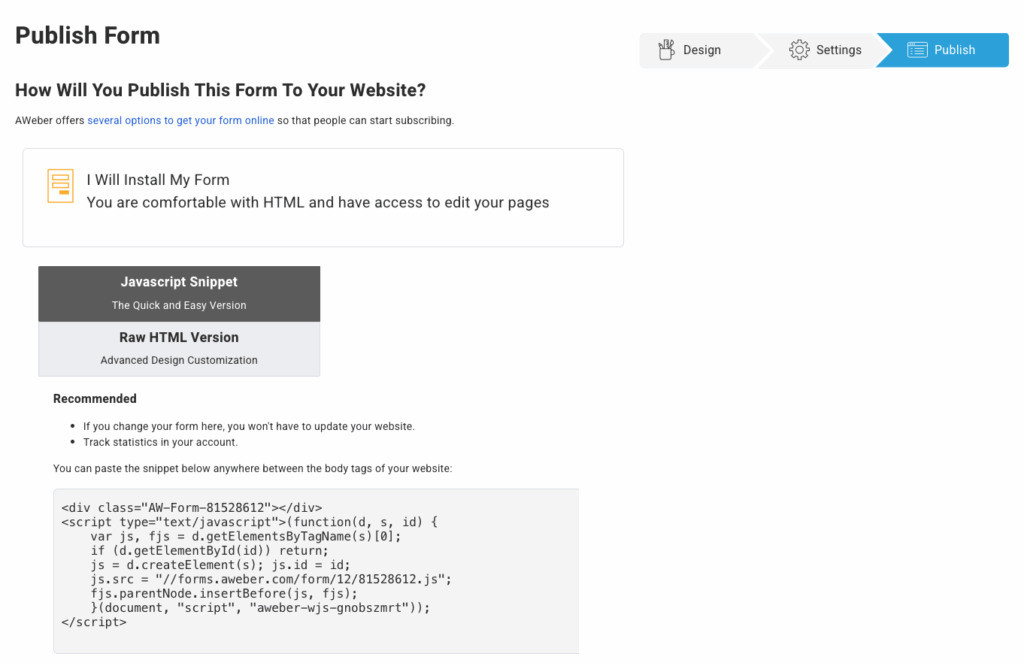
Step 1: Create Your Email Signup Form
Start by designing a form in your email platform. We offer several form types—inline, pop-up, and slide-in—that work seamlessly with Wix’s visual builder.
Keep your form simple. Ask only for the information you actually need—typically just a name and email address. Every additional field you add reduces signups.
Make your value crystal clear. “Get our free 10-page brand guide” converts far better than “Subscribe to our newsletter.” Tell visitors exactly what they’ll receive.
Customize your form design to complement your Wix site’s aesthetic. Match colors to your brand palette and choose fonts that feel cohesive with your existing design.
Step 2: Get Your Embed Code
Once your form looks perfect, grab the code to add it to Wix:
Click “Publish” or “Embed” in your form builder
Select “JavaScript” or “HTML” embed option
Copy the complete code snippet—you’ll need every character
Our forms automatically optimize for mobile devices, so your signup form looks great whether visitors browse on desktop, tablet, or phone.
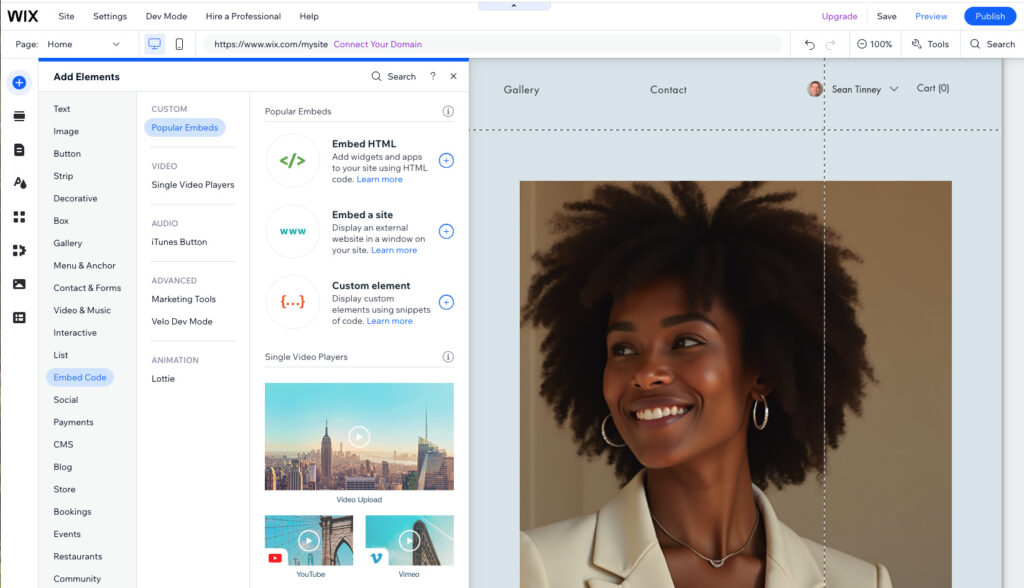
Step 3: Add the Form to Your Wix Site
Wix makes embedding external content straightforward through its visual editor:
Log into Wix and open your site editor
Click “Add Elements” (the plus icon on the left sidebar)
Select “Embed Code”
Select “Embed HTML”
Paste your complete embed code into the code box
Click “Add to Page”
Drag the form element to position it where you want
Strategic placement locations:
Homepage below your hero section (captures immediate interest)
End of blog posts (readers who finish are highly engaged)
Footer across all pages (catches visitors as they browse)
Dedicated landing page for lead magnets or free resources
Wix treats your embedded form like any other element, so you can resize, reposition, and adjust spacing using Wix’s intuitive drag-and-drop controls.
Step 4: Build Your Welcome Automation
Don’t just collect emails and forget about subscribers. The real power starts after someone signs up.
Email 1 (Instant): Welcome new subscribers, deliver any promised content, and set expectations for future emails. Make them glad they subscribed.
Email 2 (Day 2): Share your most popular content or best-selling product. Give subscribers a reason to stay engaged with your list.
Email 3 (Day 4): Offer a subscriber-only discount or bonus. Move them toward becoming a customer.
Our visual automation builder makes this simple—drag and drop email blocks, set time delays between messages, and activate. Your automation runs 24/7 without any manual work.
Step 5: Test Your Form Thoroughly
Before promoting your new signup form, test the complete experience:
Fill out the form yourself using multiple email addresses
Verify submissions appear in your email dashboard
Check that welcome automation triggers correctly
Test on mobile devices—over 60% of web traffic comes from phones
Try different browsers to ensure cross-browser compatibility
Fix any issues before driving real traffic to your site. A broken form means lost subscribers.
Troubleshooting Common Wix Integration Issues
Form not appearing on published site? Verify you pasted the complete embed code with no missing characters. Also confirm you’re viewing your published site (not the editor preview), as custom embeds only appear on the live site.
Form styling conflicts with Wix theme? Some Wix templates apply CSS that affects embedded elements. Either customize the form design in your email platform before embedding, or adjust your Wix site’s custom CSS (requires Wix Premium plan).
Wix plan limitations: Embedding custom code requires a Wix Premium plan. Free Wix sites can’t use custom embeds. You’ll need to upgrade to Combo ($16/month), Unlimited ($22/month), or higher plans to add external email forms.
Best Practices for Growing Your Wix Email List
Offer unmistakable value. Don’t hide behind vague promises. “Join 5,000+ small business owners receiving weekly growth strategies” beats “Sign up for updates” every time. Specificity builds trust.
Use multiple form placements. Don’t rely on a single signup opportunity. Add forms to your homepage, blog posts, about page, and footer. Different placements capture different visitor intents.
Keep forms ridiculously simple. Start with just email address (or email + first name). Asking for phone numbers, company names, and birthdays kills conversions. Collect additional information later through preference surveys.
Test different approaches. Create multiple form variations and track which performs best. Try different copy, placement locations, and form types. Our A/B testing tools help you identify what resonates with your Wix visitors.
Follow up immediately. Set up automated welcome emails that arrive within seconds of signup. Deliver promised content instantly and set clear expectations for future communications.
Frequently Asked Questions
What is Wix?
Wix is a drag-and-drop website builder that lets anyone create professional websites without coding knowledge. With 900+ templates, AI-powered design tools, and built-in ecommerce functionality, Wix serves small businesses, creators, photographers, restaurants, and online stores. Its visual editor makes website building accessible to non-technical users who want control over their site’s appearance.
How do I add a pop-up on Wix?
You have two options for adding email pop-ups to your Wix site:
Option 1 – Use Wix’s native lightbox: Go to Add Elements > Interactive > Lightbox in the Wix editor. This creates a pop-up window, but you’ll need to manually configure email collection and integrate with your email platform.
Option 2 – Embed a smart pop-up form: Use a pop-up signup form from your email marketing platform. Create a pop-up signup form, grab the embed code, and add it via Custom Embeds in Wix. This automatically adds subscribers to your email list and triggers welcome automations—no manual work required.
The second option provides better automation and subscriber management, making it the preferred choice for most Wix users focused on list growth.
Does Wix offer email marketing?
Yes, Wix has built-in email marketing tools (previously called Wix Ascend). The platform automatically syncs contacts from your Wix site—store customers, form submissions, and members—directly into the email tool.
However, Wix’s native email marketing has significant limitations:
Wix provides only about 30 email templates compared to 250+ in dedicated platforms. The automation capabilities are basic—you can’t build sophisticated workflows with branching paths or behavioral triggers. Segmentation options remain limited, making it difficult to send targeted messages based on subscriber actions. Most critically, you’re locked into Wix’s ecosystem with no easy way to export your marketing setup if you grow beyond the platform.
Dedicated email marketing platforms offer:
Unlimited automation workflows that run 24/7
AI-powered content generation for subject lines and email copy
Advanced segmentation based on subscriber behavior and preferences
Superior deliverability rates from platforms focused exclusively on email
The ability to maintain your email list independent of your website platform
For Wix users serious about email marketing, connecting a dedicated platform provides the tools needed to build sophisticated campaigns that drive real revenue growth.
Start Growing Your Email List with AWeber
Ready to capture more leads from your Wix website? AWeber’s drag-and-drop form builder integrates seamlessly with Wix in minutes. Create professional signup forms, build automated welcome sequences, and start converting website visitors into email subscribers.
We designed our platform for Wix users who want powerful email marketing without complexity—unlimited automations, AI writing tools, landing pages, and 24/7 support all included. No technical experience required.
Your Wix site is beautiful. Now make it profitable by capturing every visitor’s email address and building relationships that drive real revenue. Get started with AWeber today.